Tip 6 – Effective use of Transaction Controllers
Whether you are trying to script a website, a webservice or something else, quite often you find that one functional action results in several requests to a server.
Take for example an average login-request seen from a functional point of view:
 A user types in username & password and hits the Login button.
If the username/password combination was valid the user is than shown a dashboard.
This seems straight forward enough from a functional point of view. What actually happens however is a bit more than just this one request:
- Username/password are sent to an authentication service
- Authentication service sends an authenticated message back (assuming you are indeed authenticated by the application).
- The authentication message contains a redirect away from the authentication service to the dashboard a user expects. This redirect contains information such as the AuthToken that was just recieved from the service.
- Subsequent requests for the Dashboard-contents are sent.
In a simple setup, this may require only 1 request in Jmeter, just the login. Since Jmeter can take care of any redirecting itself.
Making Jmeter responsible for blindly following all redirects however, does not always give you the performance metrics you may want or need. When you need to know exactly which part of the login sequence is giving your users some form of grief, you may want to build these requests completely yourself in Jmeter. That will give you the possibility to see if there is high latency, big loads etc. on a per-request basis.
You may end up with something like this: 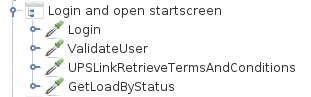
The 4 requests you see in this example are all separate requests used to log a user into the system and get the base information for the first screen of the application.
This sequence could have been captured in 1 request, Login, since the other requests are handled by HTTP/302 responses.
By building the requests yourself and clustering them together in a Logic Controller you now can see and measure how long the entire login request, step by step, takes. The Logic Controller I have used here is a Transaction Controller, this controller can add all child-transactions into one single response time for you by setting the appropriate flag. 
When set, “Generate parent sample” will ensure that your statistics have a single statistic for the complete set of requests, yet you can easily gain information on the separate requests while running a loadtest by unchecking this flag and looking into each step by itself as well.
This gives you the possiblity to find out which of the steps slows the entire transaction of logging in to your application (or whichever functional step you define in a Transaction Controller of course) .

One thought on “Jmeter Tips & Tricks – Tip 6”