Penetration test or vulnerability scan?

What is the difference between a penetration test and a vulnerability scan?

First of all, let me make this clear, in the context of this article when I use the term penetration test or vulnerability scan I am referring to an Information Technology infrastructure such as software, operating system, network interfaces etc.

Penetration test in action

Penetration test in action

The easiest way to see what the difference is between a penetration test and a vulnerability scan is by comparing the definitions. A problem which then arises is which definitions do we adhere to?

Definitions of penetration test and vulnerability scan

There are quite a few different definitions we can adhere to. In order to keep things relatively simple, I will stick to the Wikipedia definition:

A penetration test, colloquially known as a pen test, is an authorised simulated attack on a computer system that looks for security weaknesses, potentially gaining access to the system’s features and data.

Unfortunately I could not find a similar Wikipedia entry for vulnerability scans, so I have tried to make that one up myself:

A vulnerability scan is an automated process supported by means of a vulnerability scanner (computer software), which produces a report with all potential vulnerabilities in a given part of IT infrastructure.

As the names already indicate, one is a test, whereas the other is a scan.

Vulnerability scan

Vulnerability scan

The difference explained

Let me start with the scan, a vulnerability scan is a, mostly, automated process. The scanner is a piece of software that can work in a manner of ways. There are spidering scanners but also scanners that work as a proxy between a browser and the target system, recording the users actions. These actions are then later replayed by the scanner and all actions are tested on possible vulnerabilities. In a vulnerability scan you let a tool do the work for you, the tool generates a bunch of results which can then be used to create a report for the client who requested the scan.

Likewise it is possible to state that a penetration test is just that, a test. Testing is a cognitive activity, you need to use your creativity in order to execute a proper penetration test. Of course you can use the outcomes of a scan as input or inspiration for your penetration test. In a penetration test you actually try to prove that any potential vulnerability is indeed a true security risk and can lead to a breach. During a penetration test, the tester is actively searching for ways to exploit vulnerabilities in the IT infrastructure. Generally a penetration test will have constraints such as a clearly defined goal, quite often a clear timebox in which the tests can be executed and limitations to what part of  the IT infrastructure under test is allowed to be tested for vulnerabilities.

So far so good, right?

The difference between a vulnerability scan and a penetration test is that a penetration test requires a lot of knowledge, by the tester, about how to exploit possible vulnerabilities, testing for these exploits takes up a lot of time and effort. Reporting on them also takes up a lot of time, since you need to be able to explain what you did, with what purpose and what was the result and how or why is this result not a desired behaviour of the application. On top of that, with a good penetration test report, you also advice on how to mitigate or limit the risks involved with the vulnerability. Ideally you even propose a solution to fully close the vulnerability.
A vulnerability scan however, takes up a lot less effort and time, the main time is used up by the scanner (Nikto, ZAP, BurpSuite etc.) to actually scan for vulnerabilities. The tool generates a report, which you then rewrite into something human readable and understandable. There are no actual exploits reported, so the possibility of having (and reporting) false positives, or worse, false negatives, is very high.

Check the reportingSo, when requesting a penetration test, be sure what to look for and what to expect in the reporting. If you do not receive any clear proof that vulnerabilities were indeed tested and hopefully exploited succesfully, if there are no proper suggestions on how to resolve these vulnerabilities, you can assume you received a vulnerability scan rather than a proper penetration test.


Software Security Testing Tips

Software Security Testing Tips for functional testers

In this article  I attempt to give some basic security testing tips and tricks for functional testers with limited technical skills. The focus of the article is mainly on XSS and SQL insertions and how to test for them in forms.

The other day I, for the first time, gave the Polteq security training. The original training was written by a (former) colleague quite a few years ago, so the training was clearly up for a bit of a rewrite. OSI 7 layer modelWhile rewriting the training I tried to make sure all items I deemed important were addressed, items ranging from the OSI 7 Layer Model, to the CIA Traid all the way down to nmap portscans and executing XSS exploits.

The training makes use of several test environments. Portscans we executed on a local instance of Metasploitable 2.0, while XSS exploit excercises were based on Gruyere.

XSS exploits with JavaScript alerts

In order to execute the basic validations of XSS exploits, it might be useful to at least understand what a JavaScript alert popup is and how to write one. A Basic popup can be generated with the following minimal script:

<SCRIPT>
    alert(1);
</SCRIPT>

XSS insertionIf you want to do something a bit more special you can of course change the alert to give you something useful, such as your cookie information:

 
<SCRIPT>
    alert(document.cookie);
</SCRIPT> 

Once you have managed to get the application to show the popup, showing your cookie information, it is important to understand why this is a security issue.

Know your SQL basics

During the training we also touch on some SQL insertions to login to a (highly insecure) Mutilidae instance. In order to do this, the tester will need to figure out what the SQL query is the PHP application fires off to the Database. Once they have found this query, they will need to find a way to trick the application in giving them an authenticated session without having credentials for the application.
The original query can be found by entering a quotation mark in the username field. This will trigger the PHP debug screen showing you what went wrong and more importantly it will give an SQL query:

SELECT * FROM accounts WHERE username = ''' AND password = '';

In order to get past this query without sending a username/password combination several things should be known to you, the tester.
First of all, the SQL query will return a boolean to the application, telling the application whether or not you logged in succesfully (e.g. whether or not the combination of username and password were indeed a unique combination in the database).
Once you realize you need the database to return a TRUE value to the application, you will need to know how to game the SQL query to actually always return TRUE. To do this, you will need to make sure the query no longer contains the AND clause.
In order to do that, you, the tester, need to know how to write comments in SQL statements. In this case the database server attached to this application is a MYSQL server. Commentary in SQL statements can be achieved as follows:

mysql> SELECT 1+1;     -- This comment continues to the end of line

Pay close attention in this comment, the space behind the two dashes needs to be there! During the training that was one of the things the testers missed.

So where you want to go is that the query you submit, when you hit the login button is at least deminished to the following;

SELECT * FROM accounts WHERE username = '' -- AND password = '';

Now you need to know how to trick the database into returning the TRUE back to the application. One very easy way is to tell it that 1=1.

The query I was looking for in the training ends up looking as follows:

SELECT * FROM accounts WHERE username='' OR 1= 1 -- ' AND password=''

So the full “username” you fill in (in Mutilidae) should look like this:

' OR 1=1 --

There is of course an easier way for the average tester to test for this kind of issues. Firefox has a few very useful plugins that can be used to do a relatively quick and easy check on XSS or SQL insertion vulnerabilities in a given webform, for example “XSSme“. Keep in mind when using a tool like this, that is is quite likely to give either false positives or false negatives, e.g. do not blindly trust the plugin, but always verify that what it reports is indeed true!

Quick tests for SQL or XSS insertions can at least give you an idea of the level of security of the application. If you really want to be sure your application is safe, get a penetration tester to test it properly (so in other words, give me a call).

Jmeter Tips & Tricks – Tip 7

Tip 7 – adjusting the JVM HEAP size, why and how to

When running JMeter tests, it may happen that the test is not successful and JMeter crashes with an OutOfMemoryError. This can happen due to all kinds of things, most of the time however you are trying to generate too many threads with an insufficient amount of memory allocated to your Java Virtual Machine. More information on what the HEAP is, how the JVM deals with the HEAP can be found here.

The HEAP size is defined on startup of your java application, in our case when we start JMeter. In other words, adjusting the HEAP means we will need to adjust the startup script. The startup script can be found in your JMeter “bin” directory. In my case, on a linux environment, it can be found here:

/opt/apache-jmeter-3.1/bin

When opening the “jmeter” file in your favorite editor, scroll down until you hit a line stating the following (on Windows based systems open “jmeter.bat”):

# This is the base heap size -- you may increase or decrease it to fit your
# system's memory availability:
HEAP="-Xms512m -Xmx512m"

On Windows systems the line looks slightly different, in the jmeter.bat, due to the nature of BATCH files and DOS working differently from Linux systems

set HEAP=-Xms512m -Xmx512m

When you adjust this line to read something like this:

# This is the base heap size -- you may increase or decrease it to fit your
# system's memory availability:
HEAP="-Xms1024m -Xmx4096m"

the HEAP size will by default be larger, meaning you do not have to think about it anymore when starting JMeter. This does pose one possible challenge, it slows down the startup of JMeter somewhat (at least on most machines I have done it). This seems to be because the JVM will first allocate all the memory you defined in the Xms param, ensuring the JVM is at the appropriate size instantly.

So, we changed the values of Xms and Xmx, what do these two mean?

-Xms ==> minimum heap size. This is the value JAVA will attempt to claim in order to run JMeter. This does NOT imply that it immediately gets this fully allocated by the OS. The OS typically doesn't give an application all blocks it asks for until really needed.
-Xmx ==> maximum heap size. This is the value JAVA will use as a maximum size of the JVM. When JMeter passes this level, an OutOfMemoryError will occur once more.

An alternative, more flexible setup to change the heapsize is to pass the JVM arguments on the commandline when starting JMeter. This of course assumes you are comfortable in commandline and start JMeter from commandline.

[user@machine ]$ JVM_ARGS="-Xms1024m -Xmx2048m" jmeter

Be Aware!

Please always make sure you leave enough memory for your OS and other applications to run on your machine when allocating more HEAP space to a JVM. Not leaving enough memory for your OS to keep running will result in your machine simply being non-responsive and thus your test and testresults being rendered useless.


5 common reasons for a penetration test

windowshackingI am slowly but steadily moving more and more into software security. This has led me to have regular discussions on the reasoning behind doing a penetration test on an application. “Why do did  you decide to have your application subjected to a penetration test?” Is a question I generally ask my (prospective) customers. Most of the times I cannot get a clear answer on this question. Answers vary between “I want to ensure my application is safe” to “We are required to do it for ISO certification”.

The most common reasons for requesting a penetration test can be summarized in the following categories:

  • Peace of mind – we have done what we can to make sure the data is safe from our side
  • Image – our company image will be severely damaged if we are hacked or have security issues on the application
  • Financial risks – we store sensitive data, it will cost of dearly if that data is compromised in some way
  • Certification – we want to attain ISO27001 certification and need regular penetration tests for that
  • Trust – we have bought a software solution and want to make sure it is not open to abuse. But also on the vendor side: we want to be able to tell (and show) our customers that our software is safe and not open to abuse or data leaking

Before I agree to start working on a penetration test on your application or environment I want to know what the real reasons for you asking for a penetration test are.

Why do I want to know the reasoning behind a request for a penetration test?

The answer is quite simple, I want to understand which risk (if any) you are trying to cover when requesting a penetration test. In order to make sure the report I write after a test actually is valuable for you, my client, I want to grasp what you are afraid off.
I already mentioned the common reasons, however these reasons all have at least one type of risk behind them you, my client, are worried about.
If for example you fear your end-users might want to game your software in some way to their benefit (think of a student tracking system, which also includes their grades) we can focus the penetration test on inventorising and possibly mitigating that particular risk.

In several follow up posts I will go into some detail how a penetration test can actually help.

Jmeter Tips & Tricks – Tip 6

Tip 6 – Effective use of Transaction Controllers

Whether you are trying to script a website, a webservice or something else, quite often you find that one functional action results in several requests to a server.

Take for example an average login-request seen from a functional point of view:

LoginScreen
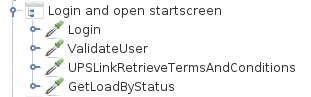
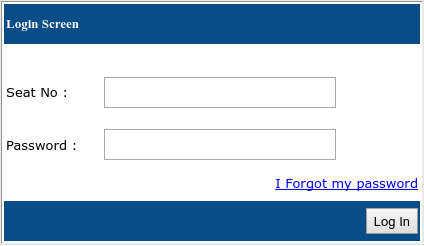
A user types in username & password and hits the Login button.
If the username/password combination was valid the user is than shown a dashboard.

This seems straight forward enough from a functional point of view. What actually happens however is a bit more than just this one request:

  • Username/password are sent to an authentication service
  • Authentication service sends an authenticated message back (assuming you are indeed authenticated by the application).
  • The authentication message contains a redirect away from the authentication service to the dashboard a user expects. This redirect contains information such as the AuthToken that was just recieved from the service.
  • Subsequent requests for the Dashboard-contents are sent.

In a simple setup, this may require only 1 request in Jmeter, just the login. Since Jmeter can take care of any redirecting itself.

Making Jmeter responsible for blindly following all redirects however, does not always give you the performance metrics you may want or need. When you need to know exactly which part of the login sequence is giving your users some form of grief, you may want to build these requests completely yourself in Jmeter. That will give you the possibility to see if there is high latency, big loads etc. on a per-request basis.

You may end up with something like this: jmeter-4requests

The 4 requests you see in this example are all separate requests used to log a user into the system and get the base information for the first screen of the application.

This sequence could have been captured in 1 request, Login, since the other requests are handled by HTTP/302 responses.

By building the requests yourself and clustering them together in a Logic Controller you now can see and measure how long the entire login request, step by step, takes. The Logic Controller I have used here is a Transaction Controller, this controller can add all child-transactions into one single response time for you by setting the appropriate flag. TransactionController
When set, “Generate parent sample” will ensure that your statistics have a single statistic for the complete set of requests, yet you can easily gain information on the separate requests while running a loadtest by unchecking this flag and looking into each step by itself as well.

This gives you the possiblity to find out which of the steps slows the entire transaction of logging in to your application (or whichever functional step you define in a Transaction Controller of course) .